Introduction
Chocolate thumbprint cookies are a beloved treat that combines the rich flavor of chocolate with a delightful filling. Their characteristic thumbprint indentation is perfect for holding a variety of delectable centers, from fruity jams to creamy ganaches. These cookies are not only visually appealing but also a joy to bite into, making them ideal for both holiday gatherings and a simple afternoon snack.
The beauty of these cookies lies in their simplicity. Using a handful of basic ingredients, you can create a treat that satisfies your sweet cravings and impresses your family and friends. Whether you prefer a classic chocolate ganache or a fruit preserve, these cookies are incredibly versatile and can be customized to your taste.
Baking chocolate thumbprint cookies can be a rewarding experience. It invites you to express your creativity, whether through the filling choices or cute decorations. With each bite revealing its secret center, these cookies are sure to become a favorite in your home.
Ingredients
- 1 cup all-purpose flour
All-purpose flour provides the structure for the cookies, allowing them to hold together while maintaining a tender crumb. It balances well with the butter, ensuring the cookies neither turn out too dense nor too crumbly. - 1/4 cup unsweetened cocoa powder
Cocoa powder adds a deep chocolate flavor to the cookies. It contributes to the dark color and enhances the overall chocolate experience that is essential to thumbprint cookies. - 1/2 teaspoon baking powder
Baking powder helps the cookies to rise slightly, creating a lighter texture. This leavening agent ensures that the cookies are not too flat, allowing for the perfect indentation. - 1/2 teaspoon salt
A little salt balances the sweetness of the cookies and enhances the overall flavor. It also deepens the chocolate notes, making each bite more enjoyable. - 1/2 cup unsalted butter, softened
Butter serves as the main fat in the recipe, giving the cookies a rich flavor and a tender texture. Softening it allows for easy creaming with sugar, which is crucial for the cookie's structure. - 1/2 cup granulated sugar
Granulated sugar sweetens the cookies and contributes to their crispy edges. It also helps with the browning, giving the cookies a beautiful appearance. - 1/4 cup brown sugar, packed
Brown sugar adds moisture and a hint of caramel flavor due to the molasses content. It also helps create a chewy texture, complementing the soft tender bite of the cookies. - 1 teaspoon vanilla extract
Vanilla extract enhances the flavor profile of the cookies. It adds depth and rounds out the sweetness, making the chocolate flavor pop. - 1 egg yolk
The egg yolk adds richness and binds the ingredients together. It contributes to the cookie's structure and promotes a soft, tender texture. - Filling of your choice (chocolate ganache, fruit jam)
The filling brings the cookies to life, offering a contrasting flavor to the chocolate cookie base. You can personalize your thumbprints with whatever you love, making each batch unique.
Directions & Preparation
Step 1: Preheat the oven to 350°F (175°C) and prepare a baking sheet.
Preheating the oven is crucial as it helps the cookies bake evenly and at the right temperature from the get-go. Lining the baking sheet with parchment paper prevents the cookies from sticking, ensuring they come off easily without breaking.
Step 2: In a bowl, whisk together the flour, cocoa powder, baking powder, and salt.
This step ensures that the leavening agent is evenly distributed throughout the dry ingredients, preventing any clumps during baking. Whisking incorporates air, which can contribute to a lighter texture.
Step 3: In a separate bowl, cream the softened butter, granulated sugar, and brown sugar until light and fluffy.
Creaming the butter and sugars creates air pockets that help the cookies rise and become tender. Make sure to beat them until the mixture is fluffy; it takes about 3-5 minutes with a mixer.
Step 4: Add in the egg yolk and vanilla extract to the butter mixture, mixing well.
Incorporating the egg yolk and vanilla adds moisture and richness to the dough. It’s important to mix thoroughly to ensure the egg and vanilla are evenly combined into the dough.
Step 5: Gradually add the dry ingredients to the wet mixture, blending until just combined.
Mixing the dry ingredients gradually prevents overworking the dough, which can lead to tougher cookies. Stop mixing as soon as you see no more dry flour to maintain a tender texture.
Step 6: Scoop tablespoon-sized balls of dough and roll them in your hands to form smooth balls.
Rolling the dough ensures uniform size and shape, which helps the cookies bake evenly. It also creates an appealing appearance for the final cookies.
Step 7: Place the balls on the prepared baking sheet, spacing them about 2 inches apart.
Spacing is essential to allow the cookies to spread without merging into one another. This also helps them bake uniformly, resulting in beautifully shaped cookies.
Step 8: Use your thumb or the back of a spoon to create an indentation in the center of each cookie ball.
The indentation is where your chosen filling will go, so make sure it's deep enough to hold it without piercing through the cookie base. This step adds a charming character to your cookies.
Step 9: Bake for 10-12 minutes, until the edges are set but the centers are still slightly soft.
Keeping a close eye during baking is key. Overbaking can lead to hard cookies, while a little softness in the center ensures a tender, chewy final product.
Step 10: Remove from the oven and let them cool on the baking sheet for a few minutes before transferring.
Cooling on the sheet allows the cookies to set up and hold their shape as they finish baking. It’s crucial not to remove them too soon, as they might fall apart.
Step 11: Once cooled, fill each indentation with your desired filling and let set.
Filling the cookies once they are cooled helps prevent the filling from melting or making the cookies soggy. Allowing the filling to set ensures it stays in place and enhances the overall texture.

Choosing the Perfect Filling for Your Cookies
The beauty of chocolate thumbprint cookies lies in their versatility, especially when it comes to fillings. You can opt for classic choices like rich chocolate ganache or fruity jams such as raspberry or apricot for a refreshing twist. Feel free to experiment with flavored creams or even nut butters for an indulgent variation that suits your tastes. The key is to match the filling with the chocolate base while ensuring it doesn’t overwhelm or underwhelm the overall flavor.
Tips for Achieving Perfect Texture
Texture is paramount in baking chocolate thumbprint cookies. To achieve that perfect balance between chewy and soft, make sure not to overmix the dough once the flour is added. This avoids gluten development, which can lead to a tougher cookie. Additionally, slightly underbaking the cookies will maintain a gooey interior, while the outer edges remain crisp. Letting the cookies cool completely before filling them preserves their texture and allows the flavors to meld perfectly.
Storing and Enjoying Your Cookies
Once your chocolate thumbprint cookies are baked and filled, proper storage is key to keeping them fresh. Place them in an airtight container at room temperature, where they can last for several days. If you’ve made flavorful variations, consider labeling them to avoid any mix-ups. These cookies are delightful on their own, but they also pair wonderfully with a cup of coffee or tea, making them a great treat for gatherings or a cozy night in.
FAQs
What if my dough is too crumbly?
If your dough appears too crumbly, it may be due to not enough moisture. Add a teaspoon of milk or water gradually until the dough comes together without being overly wet.
How can I adjust the sweetness if it is too sweet?
If the cookies turn out too sweet, consider reducing the sugar next time by 1-2 tablespoons or adding a bit of unsweetened cocoa powder to balance the flavors.
What if my cookies are spreading too much while baking?
If your cookies spread excessively, ensure your butter isn’t too warm before mixing, and chill the dough for at least 30 minutes before baking to maintain their shape.
Can I scale this recipe up or down for a smaller batch?
Yes, you can easily scale the ingredients proportionally depending on the number of cookies you wish to make. Just maintain the same ratios for each ingredient.
Is there a substitute for the unsweetened cocoa powder?
You can substitute with Dutch-processed cocoa powder for a milder chocolate flavor, but avoid using sweetened cocoa mixes, as they will alter the sweetness.
What can I do if my cookies are overcooked?
If your cookies are overcooked, they will be hard and dry. For future batches, reduce the baking time slightly, checking for doneness a minute or two earlier.
Conclusion
Chocolate thumbprint cookies offer a scrumptious blend of flavors and textures, making them an irresistible choice for cookie lovers. With the right ingredients and techniques, you can create a delightful treat that showcases your culinary skills.
Don't hesitate to experiment with different fillings and flavor combinations to make these cookies your own. Whether for special occasions or simply to treat yourself, these cookies are certain to bring joy and satisfaction with every bite.
Recipe Card
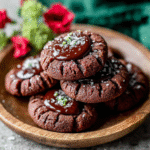
Delightful Indulgence: Chocolate Thumbprint Cookies
Ingredients
- 1 cup all-purpose flour
- 1/4 cup unsweetened cocoa powder
- 1/2 teaspoon baking powder
- 1/2 teaspoon salt
- 1/2 cup unsalted butter softened
- 1/2 cup granulated sugar
- 1/4 cup brown sugar packed
- 1 teaspoon vanilla extract
- 1 egg yolk
- Filling of your choice chocolate ganache, fruit jam
Instructions
- Preheat the oven to 350°F (175°C) and prepare a baking sheet.
- In a bowl, whisk together the flour, cocoa powder, baking powder, and salt.
- In a separate bowl, cream the softened butter, granulated sugar, and brown sugar until light and fluffy.
- Add in the egg yolk and vanilla extract to the butter mixture, mixing well.
- Gradually add the dry ingredients to the wet mixture, blending until just combined.
- Scoop tablespoon-sized balls of dough and roll them in your hands to form smooth balls.
- Place the balls on the prepared baking sheet, spacing them about 2 inches apart.
- Use your thumb or the back of a spoon to create an indentation in the center of each cookie ball.
- Bake for 10-12 minutes, until the edges are set but the centers are still slightly soft.
- Remove from the oven and let them cool on the baking sheet for a few minutes before transferring.
- Once cooled, fill each indentation with your desired filling and let set.
Notes
Additional serving suggestions: pair with a crisp salad, garlic bread, or roasted seasonal vegetables for balance.
For make-ahead, prep components separately and assemble just before heating to preserve texture.
Taste and adjust with acid (lemon/vinegar) and salt right at the end to wake up flavors.