Introduction
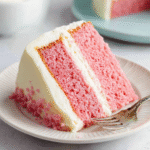
Pink Velvet Cake is a delightful twist on the classic red velvet. Its subtle sweetness paired with a hint of cocoa creates a unique flavor profile that dances on the palate. That signature pink hue, often achieved with food coloring or natural beetroot, makes it a stunning centerpiece for any occasion.
This cake isn't just about looks; its soft, velvety texture and moist crumb evoke feelings of nostalgia and celebration. Ideal for birthdays, anniversaries, or simply to treat yourself, this recipe will have your guests clamoring for seconds.
Ingredients
- 2 ½ cups all-purpose flour
All-purpose flour forms the structure of the cake and helps achieve that tender crumb. Its versatility makes it the perfect base for various cake types. - 1 ½ cups granulated sugar
Sugar sweetens the cake while also providing moisture. It contributes to the cake’s tender texture by inhibiting gluten formation. - ½ cup unsweetened cocoa powder
Cocoa powder gives the cake its subtle chocolate flavor and enhances the color. It adds depth to the overall taste experience without overpowering the cake. - 1 cup buttermilk
Buttermilk adds acidity, which interacts with the baking soda to create a light, airy texture. It also lends a slight tang that balances the sweetness. - 1 cup vegetable oil
Oil keeps the cake moist and helps create a dense, tender crumb. Its liquid form allows for even distribution throughout the batter. - 3 large eggs
Eggs provide structure through protein, stability, and moisture. They help bind the ingredients and create the cake’s lift. - 1 teaspoon vanilla extract
Vanilla extract enhances the cake’s flavor, adding a warm sweetness that complements the other ingredients. - 1 teaspoon baking powder
Baking powder acts as a leavening agent, helping the cake rise while providing a fluffy texture. - ½ teaspoon baking soda
Baking soda reacts with the buttermilk, creating carbon dioxide bubbles that contribute to leavening and tenderness. - ½ teaspoon salt
Salt balances flavor and enhances the sweetness of the cake, making each bite more satisfying. - 2 tablespoons red food coloring
Food coloring creates the signature pink hue of the cake. Adjusting the amount will deepen or soften the color as desired.
Directions & Preparation
Step 1: Preheat the oven to 350°F (175°C) and prepare your baking pans.
Preheating the oven ensures that the cake bakes evenly and achieves the desired rise and texture. While it heats, greasing and lining the baking pans with parchment paper will prevent sticking, allowing for easy removal.
Step 2: In a large bowl, whisk together the dry ingredients: flour, cocoa powder, baking powder, baking soda, and salt.
This step helps to evenly distribute the leavening agents and cocoa within the flour, which is crucial for an even rise and consistent flavor throughout the cake. Mixing right away also prevents clumping.
Step 3: In another bowl, mix the wet ingredients: sugar, oil, eggs, buttermilk, vanilla, and food coloring until well combined.
Combining wet ingredients before adding them to the dry ensures that each element is well integrated, contributing to a smoother batter. The emulsification from the oil and eggs work to create a cohesive mixture.
Step 4: Gradually add the dry mixture to the wet mixture, stirring gently until just combined.
Overmixing during this stage can result in a tough cake. The goal is to combine the ingredients without developing the gluten too much, ensuring a tender texture.
Step 5: Divide the batter evenly between the prepared pans and smooth the tops.
Dividing the batter ensures that both cakes bake evenly. Smoothing the tops also helps them to rise uniformly, preventing any doming, which can complicate layering.
Step 6: Bake in the preheated oven for 25-30 minutes, or until a toothpick inserted in the center comes out clean.
Monitoring baking time is essential for achieving the right texture. Using a toothpick helps check doneness; overbaking can lead to dry cake, while underbaking might result in a soggy center.
Step 7: Allow the cakes to cool in the pans for 10 minutes before transferring them to a wire rack to cool completely.
Cooling in the pans helps the cakes firm up slightly, making them easier to handle. Transferring to a wire rack allows for even cooling, which is crucial before frosting.
Step 8: Prepare your favorite frosting (cream cheese frosting is highly recommended) and frost between the layers and on top.
Frosting adds not only flavor but also moisture, enhancing the cake's overall taste and mouthfeel. A cream cheese frosting pairs beautifully with the cake’s flavor profile.
Step 9: Slice and serve, enjoying the beautiful pink layers.
Slicing the cake showcases the lovely pink interior, inviting enjoyment from both the eyes and palate. Presenting the cake beautifully can elevate the experience for your guests.

The Perfect Frosting for Pink Velvet Cake
When it comes to frosting a Pink Velvet Cake, cream cheese frosting is a favorite for many. Its tangy richness balances the cake's sweetness, creating a harmonious bite. To create a smooth texture, ensure your cream cheese is at room temperature before mixing. Whip in heavy cream or butter for an airy consistency that beautifully complements the cake.
Making the Pink Velvet Cake Your Own
Experimenting with flavors can elevate your Pink Velvet Cake experience. For a twist, consider infusing it with lemon zest or almond extract for an unexpected layer of flavor. You can also swap out the cocoa powder for a light, complementary spice, such as cinnamon or nutmeg, giving it a new identity while remaining delicious.
Serving Suggestions to Delight Your Guests
This striking Pink Velvet Cake is versatile for any occasion. Serve it with fresh berries for a light, fruity contrast or alongside a scoop of vanilla ice cream for a decadent treat. For an elegant presentation, dust with powdered sugar or add edible flowers for visual appeal, making it a stunning centerpiece for any dessert table.
FAQs
What can I do if my cake batter seems too thick?
If your batter appears too thick, consider adding a tablespoon or two of buttermilk gradually until the desired consistency is achieved. Too thick of a batter can lead to a dense cake.
My cake turned out bland, what should I do next time?
Ensure you're using fresh ingredients, especially baking powder and vanilla extract. Consider increasing the vanilla or adding a touch of salt to amplify the flavors for the next bake.
What’s the best way to prevent my cake from doming?
To minimize doming, ensure your oven is properly heated before inserting the cake. Additionally, consider using baking strips around the pans to promote even cooking.
Can I substitute buttermilk with regular milk?
If you don’t have buttermilk, you can make a substitute by adding one tablespoon of vinegar or lemon juice to a cup of regular milk. Let it sit for a few minutes before using.
How can I make my cake more vibrant pink?
To achieve a more vibrant pink, add additional drops of food coloring gradually until the desired shade is reached. Ensure to mix well for an even distribution.
What can I do if my frosting is too runny?
If your frosting is too runny, chilling it in the refrigerator for about 15-20 minutes can help firm it up. You can also add more powdered sugar to thicken the consistency.
Conclusion
Creating a Pink Velvet Cake is not only simple but immeasurably satisfying. The blend of flavors and textures makes it an unforgettable dessert for any gathering.
As you embrace this recipe, remember that baking is as much about creativity as it is about following instructions. Feel free to make it your own, resulting in a personal touch that will impress your family and friends.
Recipe Card
Indulge in a Fluffy Pink Velvet Cake Experience
Ingredients
- 2 ½ cups all-purpose flour
- 1 ½ cups granulated sugar
- ½ cup unsweetened cocoa powder
- 1 cup buttermilk
- 1 cup vegetable oil
- 3 large eggs
- 1 teaspoon vanilla extract
- 1 teaspoon baking powder
- ½ teaspoon baking soda
- ½ teaspoon salt
- 2 tablespoons red food coloring
Instructions
- Preheat the oven to 350°F (175°C) and prepare your baking pans.
- In a large bowl, whisk together the dry ingredients: flour, cocoa powder, baking powder, baking soda, and salt.
- In another bowl, mix the wet ingredients: sugar, oil, eggs, buttermilk, vanilla, and food coloring until well combined.
- Gradually add the dry mixture to the wet mixture, stirring gently until just combined.
- Divide the batter evenly between the prepared pans and smooth the tops.
- Bake in the preheated oven for 25-30 minutes, or until a toothpick inserted in the center comes out clean.
- Allow the cakes to cool in the pans for 10 minutes before transferring them to a wire rack to cool completely.
- Prepare your favorite frosting (cream cheese frosting is highly recommended) and frost between the layers and on top.
- Slice and serve, enjoying the beautiful pink layers.
Notes
Additional serving suggestions: pair with a crisp salad, garlic bread, or roasted seasonal vegetables for balance.
For make-ahead, prep components separately and assemble just before heating to preserve texture.
Taste and adjust with acid (lemon/vinegar) and salt right at the end to wake up flavors.