Introduction
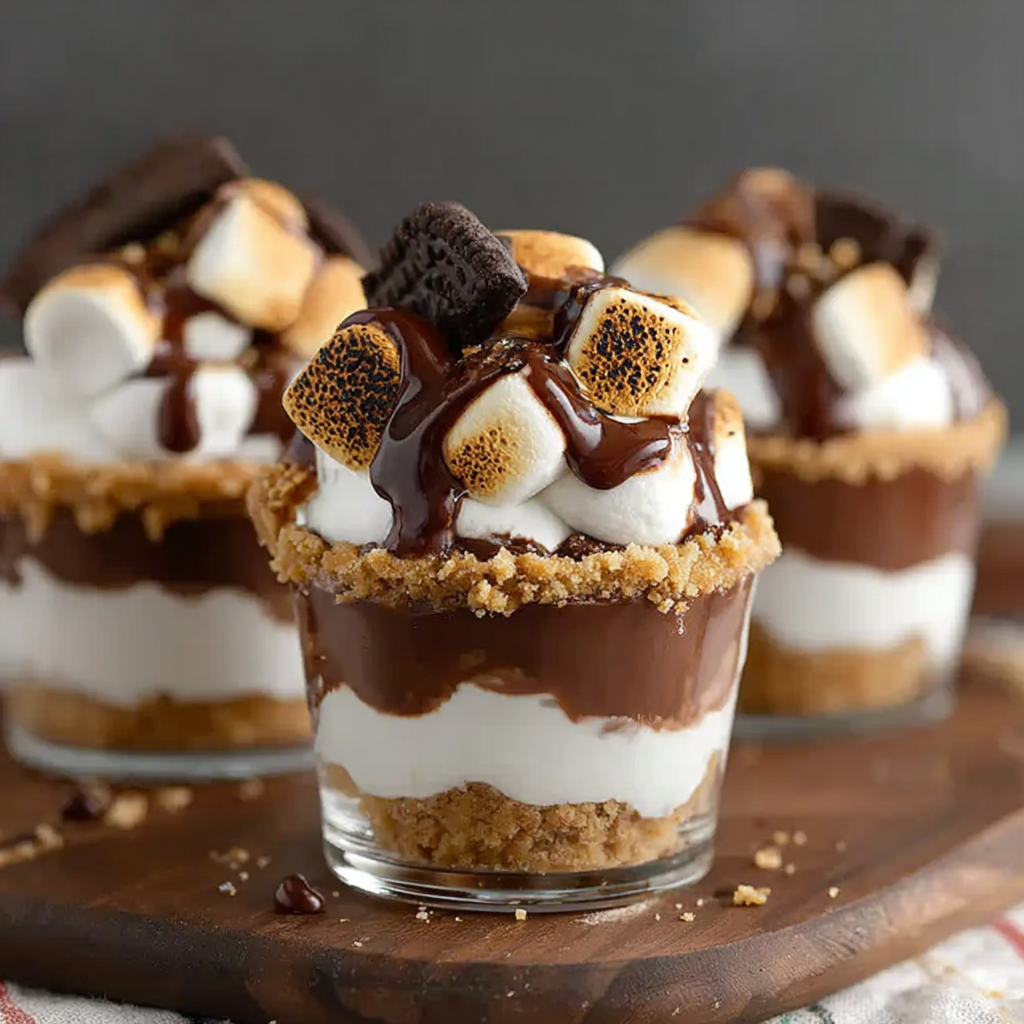
S'mores Cups are a simple twist on the classic camping treat, perfect for satisfying your sweet tooth with minimal effort. These delightful desserts combine the rich flavors of chocolate, marshmallows, and graham crackers into a handheld form, ideal for gatherings or a cozy night in.
This fun and versatile recipe allows you to enjoy all the comforts of s'mores without the need for a campfire. Each cup is a bite-sized bliss, with layers of textures and flavors coming together for a delightful experience. Let’s dive into creating these irresistible treats!
Ingredients
- 1 cup graham cracker crumbs
Graham cracker crumbs form the base of your S'mores Cups, giving them that signature crunchy texture and sweet flavor reminiscent of traditional s'mores. - 1/4 cup unsalted butter, melted
The melted butter binds the graham cracker crumbs together, ensuring a sturdy base for the cups while adding richness that complements the other ingredients. - 1/2 cup milk chocolate chips
Chocolate chips provide a creamy, luscious filling for the cups. Milk chocolate adds a balanced sweetness that pairs perfectly with the s'mores theme. - 1/2 cup mini marshmallows
Mini marshmallows are essential for the classic s'mores flavor, offering a chewy, gooey element that melts beautifully in the baking process. - 1/4 cup mini chocolate chips
These smaller chocolate chips are sprinkled on top to create an extra layer of chocolatey goodness and to enhance the visual appeal of the cups. - 1/4 teaspoon vanilla extract
Vanilla extract amplifies the flavors in the cups, adding a warm aromatic note that enhances the overall sweetness and balance.
Directions & Preparation
Step 1: Preheat your oven to 350°F (175°C).
Preheating the oven ensures that your S'mores Cups bake evenly from the moment they enter. This critical step helps achieve that perfect balance of a crispy exterior and a gooey interior.
Step 2: In a mixing bowl, combine the graham cracker crumbs and melted butter.
Mixing the graham cracker crumbs with melted butter allows for a uniform distribution of moisture, which is crucial for forming a sturdy crust. The mixture should hold together when pressed.
Step 3: Press the mixture into the bottom of a muffin tin to form the bases.
Pressing the crumbs tightly into the muffin tin molds creates a solid foundation that will hold the filling. It’s important to ensure it's evenly distributed to prevent any structural weaknesses.
Step 4: Bake the crust for 5-7 minutes until slightly golden.
Baking the crust helps set it, creating a deliciously crisp base that contrasts nicely with the gooey filling. Keep an eye on it to avoid over-browning.
Step 5: Remove the crust from the oven and sprinkle chocolate chips evenly over each cup.
Adding chocolate chips immediately after baking allows them to begin melting, which creates a lovely chocolate layer for your cups. This step incorporates aroma and enhances flavor.
Step 6: Top each cup with the mini marshmallows.
Layering marshmallows on top at this stage creates the iconic s'mores experience. They will puff up and caramelize during the next baking step for that classic toasted taste.
Step 7: Return the muffin tin to the oven and bake for an additional 3-5 minutes.
This quick second bake allows the marshmallows to become golden and gooey, achieving that signature s'mores texture. Watch closely as they can go from perfectly toasted to burnt.
Step 8: Remove from oven and sprinkle with mini chocolate chips immediately; let cool.
The residual heat will help the mini chocolate chips melt just enough to adhere to the marshmallows, creating a pleasing presentation. Allowing them to cool slightly makes them easier to remove from the tin.
Step 9: Run a knife around the edges to carefully remove the cups from the tin.
This step is important to ensure your S'mores Cups come out intact. Gently running a knife along the edges helps release any stuck bits, preserving their shape.
Step 10: Serve warm for the best gooey experience, or allow to cool completely.
Serving the cups warm maximizes the gooey nature of the marshmallows and melted chocolate, providing that perfect s'mores experience. If they cool fully, they become a delightful chewy treat with a different texture.

Creative Flavor Variations
While the classic S'mores Cup formulation is undeniably delicious, exploring flavor variations can elevate your dessert experience. Consider adding a layer of peanut butter or using dark chocolate chips for a richer profile. You can also experiment with flavored extracts, such as almond or mint, to create a unique twist that resonates with your personal taste.
Adapting for Different Diets
This S'mores Cups recipe can be adapted to various dietary needs. To create gluten-free versions, simply substitute graham cracker crumbs with gluten-free options, ensuring that all other ingredients meet dietary restrictions. For a dairy-free approach, swap in vegan butter and dairy-free chocolate, allowing everyone to indulge without compromise.
The Perfect Companion: Pairing Suggestions
S'mores Cups pair wonderfully with various beverages, making them an excellent addition to any gathering. Consider serving them alongside cold milk for a classic touch, hot chocolate for extra indulgence, or even a fruity iced tea for a refreshing contrast. These pairings enhance the overall dessert experience and cater to diverse palates.
FAQs
Can I use flavored chocolate for these cups?
Absolutely! Flavored chocolate can add a unique twist. Just make sure the flavor complements the other ingredients.
What if my crust is too crumbly?
If the crust is too crumbly, try adding a bit more melted butter to ensure better binding. Sometimes a little extra moisture can help it hold together better.
Is there a way to ensure the chocolate melts perfectly?
To ensure the chocolate melts evenly, you can let the cups sit in the oven for a minute or two after turning the heat off, allowing residual heat to work its magic.
How can I make these cups smaller for a party?
For smaller cups, you can use a mini muffin tin. Just adjust the baking time slightly shorter to prevent burning.
Can I add toppings to the marshmallows?
Definitely! You can sprinkle crushed nuts, toffee bits, or even extra graham cracker crumbs on the marshmallows before they bake.
What do I do if the marshmallows overflow?
If your marshmallows overflow, it’s likely they need to be removed just a bit sooner. Keep a close eye during the last baking phase to prevent excess marshmallow from spilling.
Conclusion
Crafting S'mores Cups at home is a delightful way to enjoy a classic dessert with a modern twist. They are not only easy to make but also offer a customizable approach that can satisfy various palates and preferences.
Whether you’re serving them at a gathering or enjoying a quiet night in, these treats are sure to be a hit. So gather your ingredients and get ready to indulge in these deliciously warm, gooey S'mores Cups!
Recipe Card
Indulgent S'mores Cups for Cozy Gatherings
Ingredients
- 1 cup graham cracker crumbs
- 1/4 cup unsalted butter melted
- 1/2 cup milk chocolate chips
- 1/2 cup mini marshmallows
- 1/4 cup mini chocolate chips
- 1/4 teaspoon vanilla extract
Instructions
- Preheat your oven to 350°F (175°C).
- In a mixing bowl, combine the graham cracker crumbs and melted butter.
- Press the mixture into the bottom of a muffin tin to form the bases.
- Bake the crust for 5-7 minutes until slightly golden.
- Remove the crust from the oven and sprinkle chocolate chips evenly over each cup.
- Top each cup with the mini marshmallows.
- Return the muffin tin to the oven and bake for an additional 3-5 minutes.
- Remove from oven and sprinkle with mini chocolate chips immediately; let cool.
- Run a knife around the edges to carefully remove the cups from the tin.
- Serve warm for the best gooey experience, or allow to cool completely.
Notes
Additional serving suggestions: pair with a crisp salad, garlic bread, or roasted seasonal vegetables for balance.
For make-ahead, prep components separately and assemble just before heating to preserve texture.
Taste and adjust with acid (lemon/vinegar) and salt right at the end to wake up flavors.