Introduction
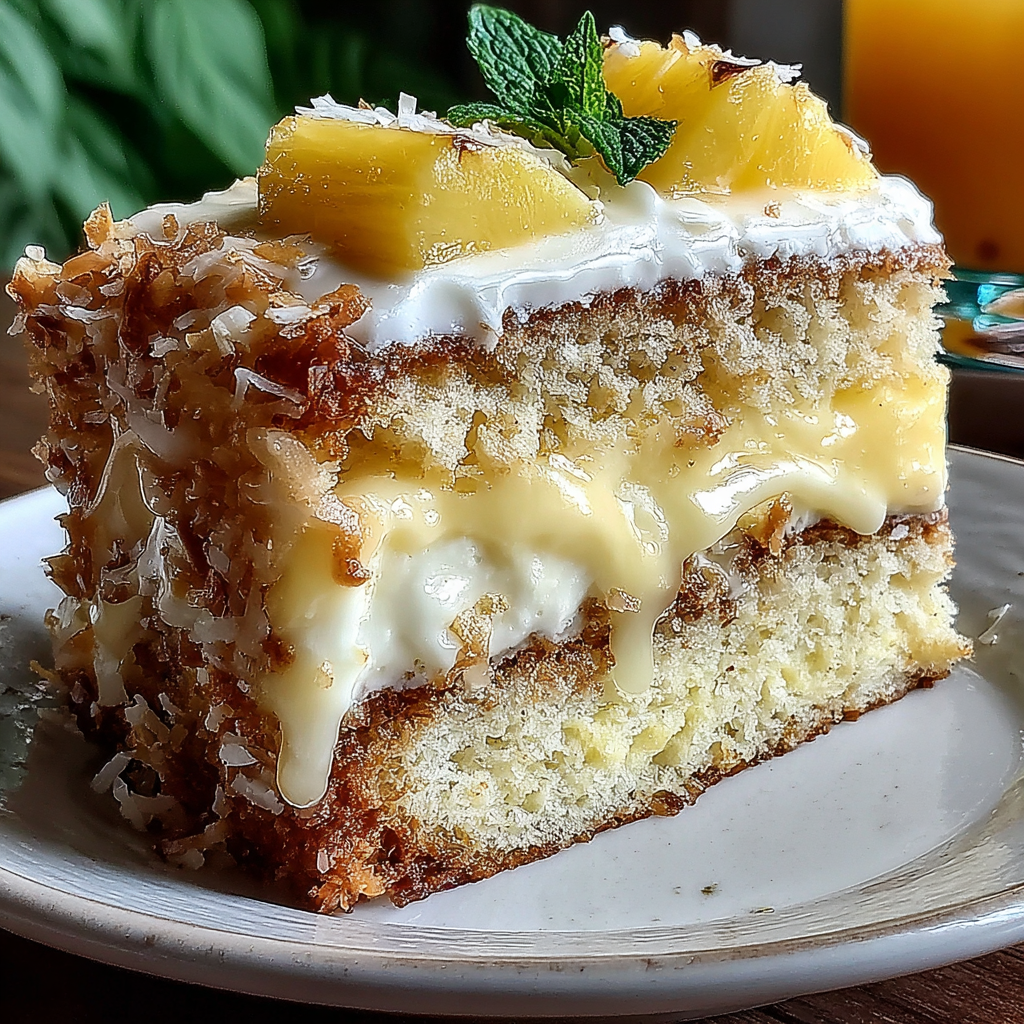
Hawaiian Pineapple Cake is a delightful dessert that captures the essence of tropical flavors in every bite. Its sunny disposition evokes thoughts of sandy beaches and warm breezes, making it a perfect treat for gatherings or a sweet afternoon indulgence.
With its tender crumb and sweet, tangy pineapple, this cake brings together simplicity and flavor that both novice and experienced bakers can appreciate. Its fruity brightness is beautifully complemented by a rich cream cheese frosting, creating a delightful balance that will keep your guests coming back for more.
Ingredients
- 2 cups all-purpose flour
This forms the base of the cake, providing structure and a tender crumb. The flour helps to bind the ingredients together while retaining moisture from other wet ingredients. - 1 ½ cups granulated sugar
Sugar adds sweetness, which balances the tartness of the pineapple. It also contributes to the cake's texture, ensuring a moist and tender result by retaining moisture during baking. - 1 cup crushed pineapple (with juice)
The crushed pineapple not only infuses the cake with tropical flavor but also adds moisture, making the cake incredibly soft and flavorful. It serves as a natural flavor enhancer that pairs beautifully with the other ingredients. - ½ cup unsalted butter (softened)
Butter enriches the cake with a rich flavor and creamy mouthfeel. It also aids in creating a tender texture, helping the cake to rise beautifully in the oven. - 3 large eggs
Eggs provide structure and stability to the cake while also adding moisture. They help bind the ingredients together and contribute to the cake's rise during baking. - 1 teaspoon baking powder
Baking powder acts as a leavening agent, helping the cake achieve a light and fluffy texture. It causes the cake to rise by producing carbon dioxide when mixed with wet ingredients. - 1 teaspoon baking soda
Baking soda also acts as a leavening agent, helping the cake rise further. When combined with acidic ingredients like pineapple juice, it creates a light, airy structure. - 1 teaspoon vanilla extract
This enhances the flavor of the cake, providing a sweet and aromatic backdrop that complements the pineapple. Vanilla extract adds depth and elevates the overall taste profile. - 1 cup cream cheese (softened)
Used for the frosting, cream cheese brings a tangy richness that balances the sweetness of the cake. It creates a smooth and creamy consistency that adheres well and adds flavor. - 4 cups powdered sugar
Powdered sugar sweetens the frosting and provides a smooth texture, which is ideal for spreading. It dissolves easily, creating a light frosting that pairs perfectly with the cake. - 1 tablespoon milk (or more as needed)
Milk adjusts the consistency of the frosting, making it spreadable. If the frosting is too thick, adding milk ensures it is easy to work with and achieves a great finish.
Directions & Preparation
Step 1: Preheat the oven to 350°F (175°C) and prepare your baking pans.
Preheating the oven is crucial for achieving the right texture and rise in the cake. Properly preparing the pans by greasing them prevents the cake from sticking and allows for easy removal after baking.
Step 2: In a large mixing bowl, cream together the softened butter and sugar until light and fluffy.
Creaming the butter and sugar is essential for incorporating air into the mixture, leading to a lighter cake. This process usually takes 3-5 minutes and the mixture should turn pale in color, indicating that it is well-aerated.
Step 3: Add the eggs one at a time, mixing well after each addition.
Incorporating the eggs slowly ensures that they emulsify properly into the batter, adding richness and contributing to the cake's structure. This step is key to achieving a uniform batter.
Step 4: Mix in the crushed pineapple along with its juice and vanilla extract.
Adding the pineapple and vanilla at this stage infuses the batter with flavor and moisture. The juice helps to soften the flour and works to further hydrate the dry ingredients.
Step 5: In a separate bowl, whisk together the flour, baking powder, and baking soda.
Whisking the dry ingredients beforehand ensures that the leavening agents are evenly distributed throughout the flour. This uniformity is critical for achieving an even rise during baking.
Step 6: Gradually add the dry ingredients to the wet mixture, mixing until just combined.
Mixing until just combined prevents overworking the batter, which can lead to a dense cake. A few lumps are fine; don’t worry about achieving a completely smooth mixture.
Step 7: Pour the batter evenly into the prepared baking pans.
Even distribution of the batter helps the cakes bake evenly. It can be helpful to use a spatula to smooth the tops for a more polished appearance once baked.
Step 8: Bake in the preheated oven for 25-30 minutes, or until a toothpick inserted in the center comes out clean.
Timing is crucial in baking as it determines the cake's texture. Check for doneness a few minutes before the minimum time to prevent overbaking, as ovens can vary.
Step 9: Allow the cakes to cool in the pans for about 10 minutes, then transfer to a wire rack to cool completely.
Cooling in the pans allows the cakes to set and become easier to handle. Transferring to a wire rack helps prevent sogginess and ensures that they cool evenly, reducing the risk of a gummy texture.
Step 10: While the cakes are cooling, prepare the cream cheese frosting.
Making the frosting while the cakes cool saves time and allows for an easy assembly. The cooler the cake, the better the frosting will adhere, providing a clean look.
Step 11: In a mixing bowl, beat the cream cheese until smooth, then gradually add the powdered sugar and milk.
Beating the cream cheese first ensures a creamy texture without lumps. Gradually adding the powdered sugar allows for better incorporation and prevents a cloud of sugar during mixing.
Step 12: Spread the cooled frosting evenly between the layers and on top of the cake.
Frosting between the layers not only adds flavor but also helps to keep the layers together. Spreading evenly provides a professional finish and ensures every slice is equally delicious.

Perfecting the Cream Cheese Frosting
For the perfect cream cheese frosting, it’s important to use softened cream cheese and ensure there are no lumps as you mix. You can adjust the thickness by adding more powdered sugar for a stiffer consistency or milk for a softer touch. A well-blended frosting not only enhances the flavors but also creates a beautiful, smooth finish on your cake.
Tropical Variations to Try
While traditional Hawaiian Pineapple Cake is delightful as is, experimenting with tropical flavors can elevate your dessert game. Consider adding shredded coconut or macadamia nuts for added flavor and texture. Or, swap out the pineapple for other tropical fruits like mango or passionfruit for a unique twist that resonates with island vibes.
Serving Suggestions that Impress
Pair your Hawaiian Pineapple Cake with a light dusting of powdered sugar or a tropical fruit salad for a refreshing contrast. A scoop of vanilla ice cream or coconut sorbet adds creaminess and complements the pineapple's sweetness beautifully. Presenting the cake on a decorative platter surrounded by fruit will enhance its tropical appeal.
FAQs
What if my batter is too thick?
If your batter seems too thick, try adding a little more pineapple juice or milk a tablespoon at a time to reach a smooth, pourable consistency.
Can I use fresh pineapple instead of canned?
Yes, you can use fresh pineapple by finely chopping it and ensuring to drain any excess juice, adjusting the moisture in your batter as needed.
How do I fix a cake that is too dry?
If your cake ends up too dry, consider brushing the layers with a simple syrup made from equal parts sugar and water for added moisture. Alternatively, serve with extra frosting.
What can I do if my cake is overbaked?
If your cake turns out overbaked, it may be too crumbly. Consider serving it with a generous layer of frosting to help moisten each slice.
Is there a way to make this cake lower in sugar?
You can reduce the sugar slightly and substitute some with unsweetened applesauce to maintain moisture while lowering the sweetness.
Should I refrigerate the cake after frosting?
Yes, refrigerating the cake helps set the frosting. However, let it come to room temperature for a few hours before serving to soften the texture.
Conclusion
Baking a Hawaiian Pineapple Cake is not only a treat for the taste buds but also an inviting way to bring the spirit of the tropics into your kitchen. With its lush flavors and moist texture, it’s sure to be a crowd-pleaser.
Take this recipe as a canvas—feel free to add your personal touches and variations. No matter how you choose to enjoy it, each slice will transport you to a summer paradise.
Recipe Card

Delightful Hawaiian Pineapple Cake For Your Next Gathering
Ingredients
- 2 cups all-purpose flour
- 1 ½ cups granulated sugar
- 1 cup crushed pineapple with juice
- ½ cup unsalted butter softened
- 3 large eggs
- 1 teaspoon baking powder
- 1 teaspoon baking soda
- 1 teaspoon vanilla extract
- 1 cup cream cheese softened
- 4 cups powdered sugar
- 1 tablespoon milk or more as needed
Instructions
- Preheat the oven to 350°F (175°C) and prepare your baking pans.
- In a large mixing bowl, cream together the softened butter and sugar until light and fluffy.
- Add the eggs one at a time, mixing well after each addition.
- Mix in the crushed pineapple along with its juice and vanilla extract.
- In a separate bowl, whisk together the flour, baking powder, and baking soda.
- Gradually add the dry ingredients to the wet mixture, mixing until just combined.
- Pour the batter evenly into the prepared baking pans.
- Bake in the preheated oven for 25-30 minutes, or until a toothpick inserted in the center comes out clean.
- Allow the cakes to cool in the pans for about 10 minutes, then transfer to a wire rack to cool completely.
- While the cakes are cooling, prepare the cream cheese frosting.
- In a mixing bowl, beat the cream cheese until smooth, then gradually add the powdered sugar and milk.
- Spread the cooled frosting evenly between the layers and on top of the cake.
Notes
Additional serving suggestions: pair with a crisp salad, garlic bread, or roasted seasonal vegetables for balance.
For make-ahead, prep components separately and assemble just before heating to preserve texture.
Taste and adjust with acid (lemon/vinegar) and salt right at the end to wake up flavors.