Introduction
As winter blankets the earth in beautiful white, it’s the perfect time to embrace the joys of the season through creative baking. One delightful way to celebrate is by making a Melting Snowman Pie, a charming dessert that captures the whimsy of winter while tantalizing your taste buds.
This pie combines a creamy filling with a playful visual impact, turning an ordinary dessert into something extraordinary. The epitome of festive cheer, this treat is not only visually captivating but also filled with delicious flavors your family will love.
Whether for a holiday gathering or a cozy night in, the Melting Snowman Pie encourages everyone to indulge their sweet tooth while having fun with their food. With its unique presentation and scrumptious taste, it’s bound to become a seasonal favorite.
Ingredients
- 1 pre-baked pie crust
The foundation of your dessert, the pie crust adds a satisfying crunch that contrasts beautifully with the creamy filling. It also serves as the canvas for decorating your melting snowman. - 1 cup heavy cream
Heavy cream is crucial for creating a rich and fluffy filling. When whipped, it adds volume and lightness, resulting in a smooth texture that pairs perfectly with the other ingredients. - 8 ounces cream cheese, softened
Cream cheese lends a delightful tanginess to the filling while contributing to its creamy consistency. This ingredient helps create a luxurious mouthfeel, making every bite irresistible. - 1 cup powdered sugar
Powdered sugar sweetens the filling and contributes to its smooth texture, preventing any grittiness. It dissolves easily, ensuring a creamy blend without lumps. - 1 teaspoon vanilla extract
Vanilla extract infuses the filling with warmth and depth, enhancing the overall flavor profile of the pie. Its aromatic qualities elevate the dessert, making it more appealing. - 1/4 teaspoon salt
Salt balances the sweetness of the sugar, making the flavors in the pie more pronounced. It’s a small but vital ingredient that rounds out the taste. - 1 cup mini marshmallows
Mini marshmallows create the melting snowman effect, adding a fun and whimsical touch to your pie. They'll soften slightly in the filling, enhancing the overall flavor and making it a playful treat. - Chocolate chips (for buttons and eyes)
Chocolate chips serve as decorative features for your snowman. They add a contrasting flavor and texture, making the dessert not only delightful but also visually appealing.
Directions & Preparation
Step 1: Prepare the pie crust
Start by pre-baking the pie crust according to package instructions to achieve a golden, flaky base. This crucial first step ensures that the crust holds up against the creamy filling, preventing it from becoming soggy. Allow it to cool completely before adding the filling to maintain the desired texture.
Step 2: Make the filling
In a mixing bowl, combine the softened cream cheese and powdered sugar, whisking until smooth. Gradually add in the heavy cream, vanilla extract, and salt. This step is essential for achieving a creamy texture; mixing thoroughly ensures that there are no lumps and that the flavors meld beautifully. Whipping the mixture until soft peaks form will also create a luscious consistency.
Step 3: Fold in mini marshmallows
Gently fold the mini marshmallows into your filling mixture. This step adds a delightful surprise texture and sweetness that enhances the overall flavor. Be careful not to over-mix; you want to keep the marshmallows whole so they can provide that melting snowman effect.
Step 4: Fill the pie crust
Pour the filling into the cooled pie crust, smoothing the top with a spatula. This step not only allows for an even presentation but also ensures that every bite contains the right balance of creamy filling and crust. Let the filled pie chill in the refrigerator for at least four hours to allow it to set properly.
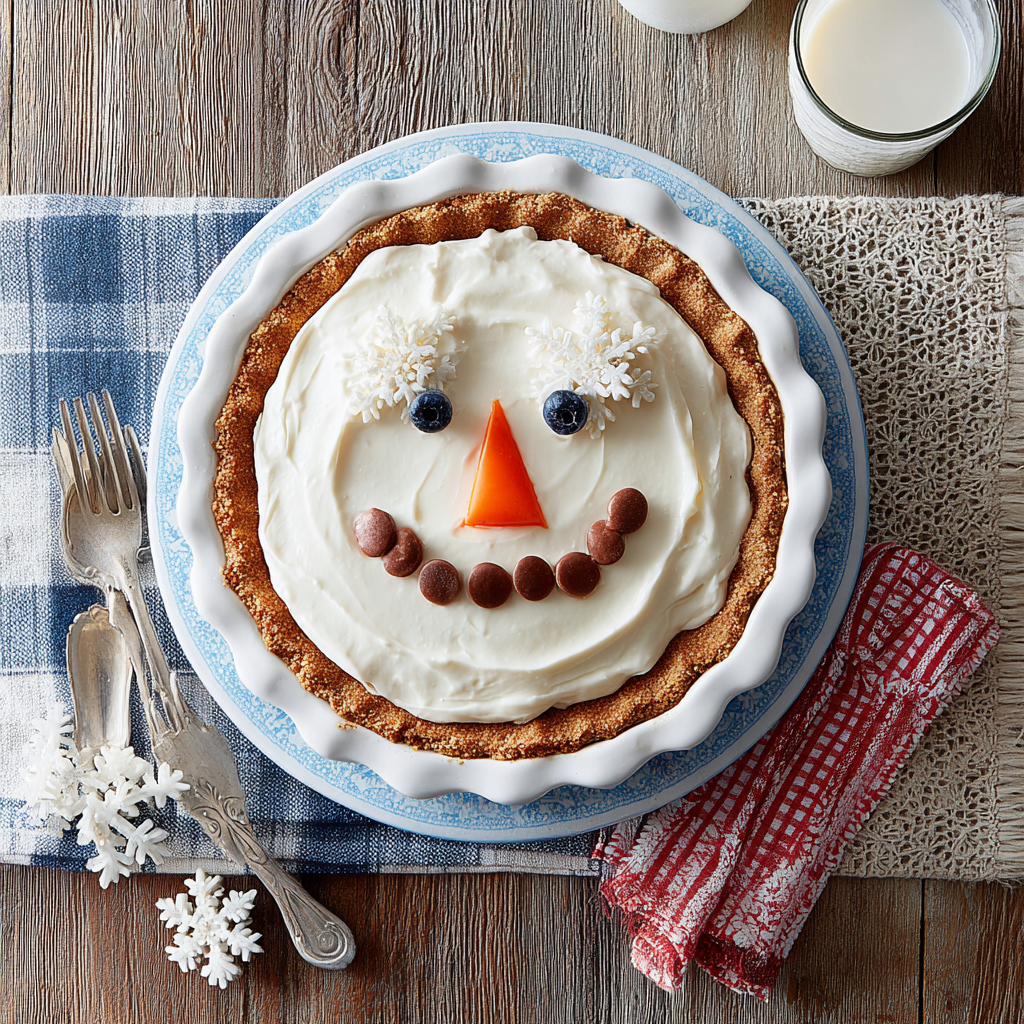
Step 5: Decorate the melting snowman
After the pie has set, it’s time to bring your melting snowman to life. Use mini chocolate chips to create eyes and buttons on the mini marshmallows. This decoration adds personality to your dessert, making it not only delicious but also a visual centerpiece for your table. Be creative with your design!

Crafting the Perfect Creamy Texture
Achieving a creamy texture in your Melting Snowman Pie is key to its success. The balance of cream cheese and whipped cream is essential, as each contributes different properties. Cream cheese provides structure and tang, while whipping heavy cream adds lightness. Together, they create a luscious filling that melts in your mouth. It's crucial to beat the cream until soft peaks form for this delightful texture.
A Whimsical Decoration with Purpose
The decoration of your Melting Snowman Pie isn’t just for show; it plays a crucial role in the overall experience. Using marshmallows for the snowman and chocolate chips for eyes introduces an element of fun that appeals to both children and adults. This playful element invites conversations and can even become a bonding activity as everyone enjoys participating in the pie's decoration together.
Setting the Stage: Chilling Time Matters
Allowing your pie to chill in the refrigerator is not just about keeping things cool; it's an essential step for flavor and texture development. Chilling helps the filling to set properly, allowing the flavors to meld together beautifully. Skipping this step may lead to a pie that is too soft or lacks the defined structure needed for elegant slices. Aim for at least four hours of chilling for best results.
FAQs
What if the filling is too thick?
If the filling is too thick, you can loosen it by gradually adding a bit of milk or cream while mixing. This helps achieve the desired creamy texture without compromising the flavor.
Can I use larger marshmallows instead of mini marshmallows?
Yes, you can use larger marshmallows, but be sure to cut them into smaller pieces to maintain the same playful snowman effect. Adjusting the size will also influence how they blend into the filling.
What if my pie crust is too crumbly?
If your crust crumbles too much, it might not have enough moisture. Next time, consider adding a bit more melted butter or water to the crust mixture to help it bind better.
How can I make the pie less sweet?
To reduce the sweetness of the pie, decrease the amount of powdered sugar. You can also add a touch more cream cheese to counterbalance the sugar without sacrificing the creaminess.
Can I use flavored marshmallows for a twist?
Yes, flavored marshmallows can add an interesting kick to your pie. Just be mindful that it may change the overall flavor, so choose a flavor that complements the filling.
What if my chocolate chips don't stick to the marshmallows?
If the chocolate chips aren’t adhering properly, you can gently press them into the marshmallows or use a bit of melted chocolate as adhesive before chilling the pie.
Conclusion
The Melting Snowman Pie is not just a treat; it’s a celebration of creativity, flavor, and the joy of baking. As you slice into the pie, witnessing the whimsical snowman with its melting effect will surely bring smiles and laughter to your gathering.
With this charming dessert, you’ll create memories that go beyond taste, inviting everyone to partake in a little bit of winter magic. So roll up your sleeves, gather your ingredients, and start baking; the fun (and the flavor) awaits!
Recipe Card
Delightful Melting Snowman Pie for Home Baking
Ingredients
- 1 pre-baked pie crust
- 1 cup heavy cream
- 8 ounces cream cheese softened
- 1 cup powdered sugar
- 1 teaspoon vanilla extract
- 1/4 teaspoon salt
- 1 cup mini marshmallows
- Chocolate chips for buttons and eyes
Instructions
- Prepare the pie crust
- Make the filling
- Fold in mini marshmallows
- Fill the pie crust
- Decorate the melting snowman
Notes
Additional serving suggestions: pair with a crisp salad, garlic bread, or roasted seasonal vegetables for balance.
For make-ahead, prep components separately and assemble just before heating to preserve texture.
Taste and adjust with acid (lemon/vinegar) and salt right at the end to wake up flavors.