Introduction
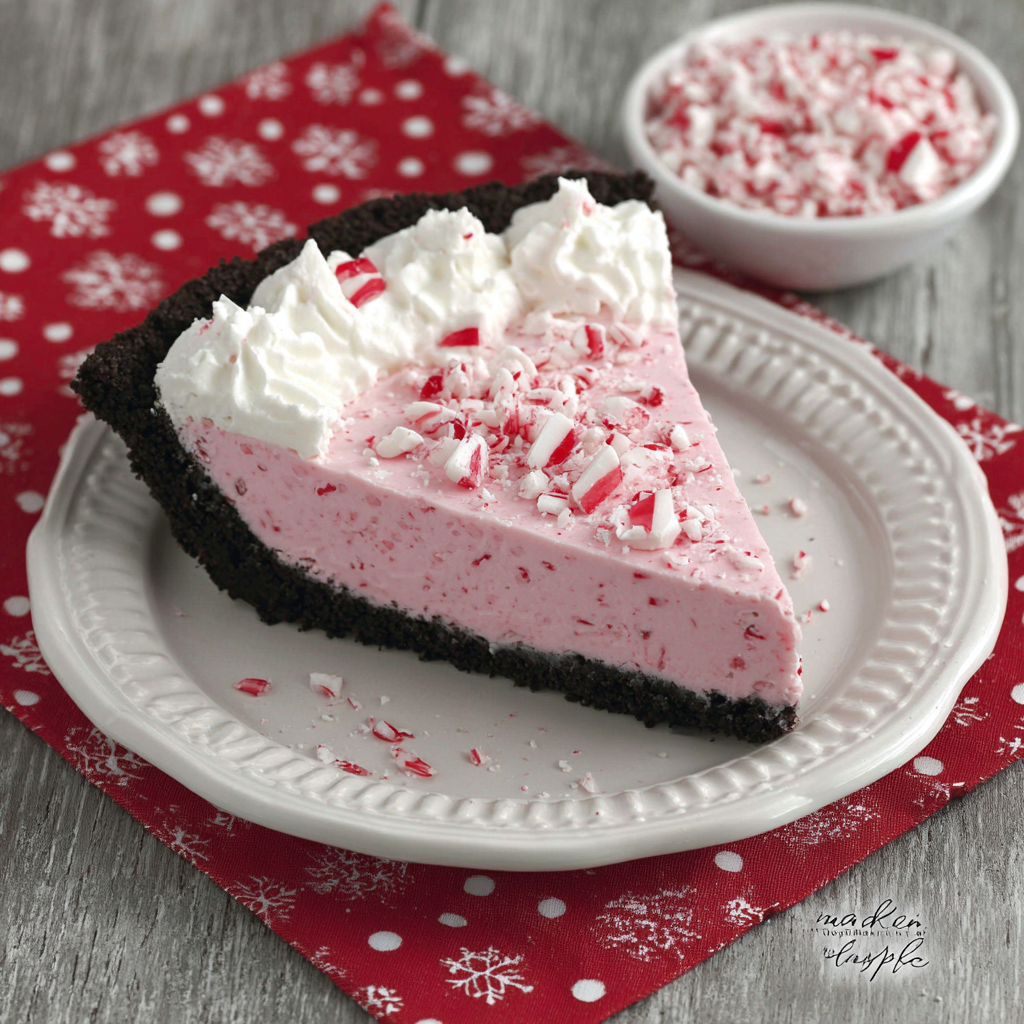
As the holiday season approaches, many of us find ourselves searching for the perfect dessert that captures the essence of Christmas. The No Bake Christmas Peppermint Pie is a delightful addition to your festive table, combining the refreshing flavor of peppermint with a rich, creamy filling that is sure to impress your guests.
What's even better is that this pie is easy to make, requiring no oven and minimal time. Ideal for busy home cooks, it allows you to focus on enjoying the season while still presenting a stunning dessert.
The crust is a buttery creation that lends a subtle sweet crunch, while the filling is a light and fluffy blend of cream cheese and whipped cream, flavored with peppermint extract, making each bite a real treat.
Ingredients
- 1 ½ cups crushed chocolate sandwich cookies
These cookies form the base of the pie, creating a rich and chocolatey crust that complements the peppermint filling perfectly. Their sweetness and texture provide a delightful crunch. - ½ cup unsalted butter, melted
Butter acts as a binding agent for the crushed cookies, helping to create a cohesive crust. The richness of unsalted butter enriches the flavor profile of the crust without overpowering the chocolate. - 8 oz cream cheese, softened
Cream cheese adds a creamy texture to the filling while providing a tangy flavor that balances the sweetness. Its softness when blended ensures that the filling is smooth and easy to spread. - 1 cup powdered sugar
This sweetener provides the necessary sweetness to the filling without adding graininess. It dissolves easily into the cream cheese, ensuring a silky consistency. - 1 teaspoon peppermint extract
Peppermint extract is the star flavoring that captures the spirit of Christmas. It offers a refreshing burst that pairs beautifully with the chocolate crust and creamy filling. - 1 cup heavy whipping cream
Heavy whipping cream is crucial for achieving a light and airy filling. When whipped, it adds volume and a luscious texture, making the pie indulgent. - Chocolate shavings or crushed candy canes for garnish
These garnishes add a festive touch and an extra crunch to your pie. Chocolate shavings enhance the chocolate flavor, while crushed candy canes introduce more peppermint goodness.
Directions & Preparation
Step 1: Prepare the crust by combining crushed chocolate cookies with melted butter.
Start by crushing the chocolate sandwich cookies into fine crumbs, which can be easily achieved using a food processor or by placing them in a plastic bag and rolling over them with a rolling pin. When combined with the melted butter, the mixture should resemble wet sand. This step is critical as it forms the foundation of your pie, and the mixture needs to be evenly distributed in the pie dish for a consistent crust.
Step 2: Press the mixture into a pie pan to form a crust.
Using your fingers or the back of a measuring cup, firmly press the crumb mixture into the bottom and up the sides of the pie pan. Make sure to pack it tightly so that it holds together once set. A well-formed crust not only looks appealing but also provides structure for the filling, preventing it from spilling out.
Step 3: Refrigerate the crust for 30 minutes to set.
This chilling step is essential as it allows the butter to cool and solidify, helping the crust maintain its shape when you fill it. Without this step, the crust might crumble and become difficult to slice. Use this time to prepare your filling!
Step 4: In a large bowl, beat the cream cheese and powdered sugar until smooth.
Using an electric mixer, blend the softened cream cheese and powdered sugar on medium speed until the mixture is creamy and free of lumps. This step ensures that the filling is light and velvety. Make sure the cream cheese is at room temperature for easier mixing, as cold cream cheese can lead to a lumpy filling.
Step 5: Add the peppermint extract and mix until combined.
Incorporating the peppermint extract at this stage allows the flavor to fully blend throughout the filling. Taste the mixture to ensure the peppermint flavor is strong but not overpowering. The right balance is key to making sure that the pie has a refreshing yet sweet taste.
Step 6: In a separate bowl, whip the heavy cream until stiff peaks form.
Whipping the cream until stiff peaks form adds lightness to the filling. This means the cream holds its shape when lifted with a whisk. Be cautious not to over-whip, as it can turn buttery. Lightly fold the whipped cream into the cream cheese mixture for a fluffy filling, ensuring not to deflate it.
Step 7: Gently fold the whipped cream into the cream cheese mixture.
Folding is a technique that carefully combines two mixtures while preserving air. Use a spatula to lift the cream from the bottom and fold over the cream cheese mixture. This technique helps retain the airiness that makes the filling light and fluffy, which is essential for the pie's texture.
Step 8: Pour the filling into the chilled crust and smooth the top.
Once your filling is combined, pour it into the prepared crust. Use a spatula to evenly distribute the mixture and smooth the top for a clean finish. Ensuring the filling is evenly spread will result in consistent slices that maintain the pie's beautiful appearance.
Step 9: Refrigerate the pie for at least 4 hours, or overnight.
Allowing the pie to chill in the refrigerator is crucial for setting the filling, which needs time to firm up. The longer it rests, the better the flavors meld together. This patience leads to a more enjoyable texture and flavor in every bite. If time allows, overnight chilling is recommended.
Step 10: Garnish with chocolate shavings or crushed candy canes just before serving.
To add a festive touch, garnish the pie with chocolate shavings or crushed candy canes right before serving. This not only enhances the visual appeal but also adds extra flavor and texture. The garnishes also communicate to guests that they’re in for a special treat, elevating the overall presentation.

The Ideal Combination of Flavors for the Holidays
The No Bake Christmas Peppermint Pie uniquely marries the rich taste of chocolate with the refreshing zing of peppermint. This combination captures the essence of the holidays, providing a taste experience that feels familiar yet festive. The balance between the creamy filling and the crumbly crust is delightful, creating an indulgent dessert that leaves a lasting impression on anyone who takes a bite.
Customizing Your Pie for Unique Flavor Adventures
While the classic peppermint chocolate combination shines, you can easily customize this pie to suit your taste. Consider adding layers of different flavors like white chocolate, or even incorporating a hint of orange zest for a citrus twist. Ingredients can be swapped out or added, like using Nutella in place of cream cheese for an indulgent chocolate experience, making this pie your own.
The Perfect Holiday Dessert for Entertaining
This No Bake Christmas Peppermint Pie is not just easy to prepare but is also a show-stopper when presented. Its vibrant colors and festive garnishes fit perfectly into any holiday gathering, leaving your guests both impressed and satisfied. Serve it at dinner parties, family gatherings, or holiday potluck, and watch it quickly become the star on your dessert table.
FAQs
What if my filling turns out too thick?
If your filling is too thick, you can gently fold in a few tablespoons of heavy cream to lighten it up. This will help achieve a creamier texture while maintaining the same rich flavor.
Can I use a different type of cookie for the crust?
Absolutely! Feel free to experiment with different cookies like graham crackers or even vanilla wafers. Just ensure the resultant crumbs are finely crushed to achieve a uniform crust consistency.
Why didn't my pie set properly?
If your pie didn't set, it might not have chilled long enough in the refrigerator. Ensure you allow enough time for the filling to firm up; overnight is often best for stabilizing.
Can I reduce the sugar in the pie?
Yes, you can reduce the powdered sugar to taste, but be careful as it may affect the overall texture. Aim to keep some sweetness for balance against the cream cheese and heavy cream.
How can I make the pie more peppermint-flavored?
For an intensified peppermint flavor, consider increasing the peppermint extract a little at a time, or fold in some crushed peppermint candies directly into the filling for an added crunch and burst of flavor.
What should I do if the crust falls apart when slicing?
If the crust crumbles when you slice the pie, it may not have been compressed firmly enough in the pan. For the future, be sure to press the cookie mixture down tightly and allow it to set in the fridge longer.
Conclusion
The No Bake Christmas Peppermint Pie is not just about flavors; it's about creating cherished holiday memories with loved ones. Each slice embodies the spirit of the season, combining delightful textures and vibrant tastes that evoke joy in every bite.
Make sure to add this festive treat to your holiday traditions. Whether it's enjoyed after a family meal or served at a festive gathering, this pie will surely become a favorite for all ages.
Recipe Card

Delightful No Bake Christmas Peppermint Pie
Ingredients
- 1 ½ cups crushed chocolate sandwich cookies
- ½ cup unsalted butter melted
- 8 oz cream cheese softened
- 1 cup powdered sugar
- 1 teaspoon peppermint extract
- 1 cup heavy whipping cream
- Chocolate shavings or crushed candy canes for garnish
Instructions
- Prepare the crust by combining crushed chocolate cookies with melted butter.
- Press the mixture into a pie pan to form a crust.
- Refrigerate the crust for 30 minutes to set.
- In a large bowl, beat the cream cheese and powdered sugar until smooth.
- Add the peppermint extract and mix until combined.
- In a separate bowl, whip the heavy cream until stiff peaks form.
- Gently fold the whipped cream into the cream cheese mixture.
- Pour the filling into the chilled crust and smooth the top.
- Refrigerate the pie for at least 4 hours, or overnight.
- Garnish with chocolate shavings or crushed candy canes just before serving.
Notes
Additional serving suggestions: pair with a crisp salad, garlic bread, or roasted seasonal vegetables for balance.
For make-ahead, prep components separately and assemble just before heating to preserve texture.
Taste and adjust with acid (lemon/vinegar) and salt right at the end to wake up flavors.