Introduction
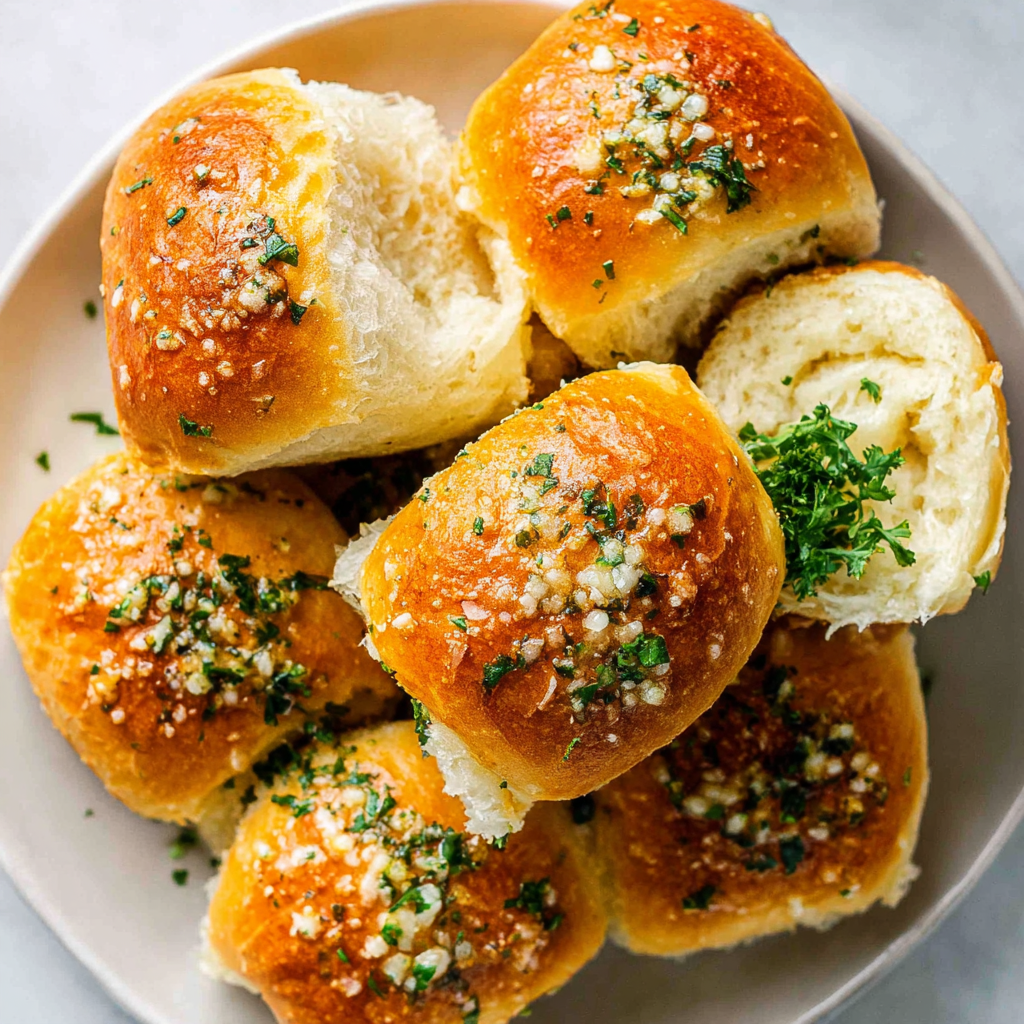
Garlic bread rolls are a delightful twist on the classic garlic bread, offering a soft, pillowy interior surrounded by a buttery, garlicky crust. These rolls are perfect for accompanying a pasta dish, serving at a holiday gathering, or simply enjoying with a soup on a chilly day.
What makes them special is the warm, inviting aroma of garlic and herbs that wafts through your kitchen as they bake. Each bite melds the rich buttery flavor with the starchiness of the bread, creating an irresistible treat.
Not only are these rolls a crowd-pleaser, but they also provide a great opportunity for home cooks to practice their bread-making skills while enjoying the simple pleasure of homemade goodness.
Ingredients
- 4 cups all-purpose flour
Flour is the backbone of these rolls, providing structure and texture. All-purpose flour contains a moderate amount of gluten, which helps create a chewy yet soft interior. - 2 teaspoons instant yeast
Instant yeast allows for a quicker rise compared to active dry yeast. It helps the rolls fluff up efficiently, resulting in a light and airy dough. - 1 teaspoon sugar
Sugar acts as food for the yeast, aiding fermentation and providing a subtle sweetness that enhances the flavor of the rolls. - 1 teaspoon salt
Salt is crucial for flavor and helps regulate yeast activity. It strengthens the gluten structure and ensures an even taste throughout the rolls. - 1 cup warm water (110°F)
Warm water activates the yeast, helping it to bloom and work its magic in the dough. It’s essential to be careful with the temperature to avoid killing the yeast. - 1/2 cup unsalted butter, melted
Melted butter enriches the dough, contributing to a tender crumb and a rich flavor. It also helps create a golden, crispy exterior once baked. - 6 cloves garlic, minced
Garlic is the star ingredient that lends its deep, aromatic flavor. When baked, it becomes sweet and mellow, filling the rolls with a delightful taste. - 1 tablespoon fresh parsley, chopped
Parsley adds a pop of freshness and color to the rolls. It enhances the overall flavor profile and complements the garlic beautifully.
Directions & Preparation
Step 1: In a large mixing bowl, combine the warm water, sugar, and instant yeast. Let it sit for 5–10 minutes until frothy.
This step activates the yeast. Watching for a foamy cap is key; it indicates that the yeast is alive and ready to help the dough rise.
Step 2: Add the melted butter, salt, and minced garlic to the yeast mixture. Stir gently to combine.
Incorporating these ingredients now infuses the dough with flavor. The butter contributes richness, while the garlic starts to permeate the mixture.
Step 3: Gradually add in the flour, one cup at a time, mixing until combined. Knead the dough for about 8–10 minutes until smooth and elastic.
This step develops the gluten in the dough. Proper kneading creates a strong structure, allowing the rolls to rise properly while maintaining a delightful texture.
Step 4: Place the dough in a greased bowl, cover with a damp cloth, and let it rise in a warm place for about 1 hour, or until doubled in size.
Rising allows the yeast to produce carbon dioxide, which creates air pockets in the dough. This leads to airy, fluffy rolls.
Step 5: Preheat your oven to 375°F (190°C). Punch down the dough to release air, then divide it into 12 equal pieces and shape each into a roll.
Punching down the dough is essential to prevent over-proofing. Shaping the rolls helps ensure they rise evenly during baking.
Step 6: Place the rolls in a greased baking dish, making sure they are close but not touching. Let them rise again for about 30 minutes until they puff up.
The second rise is crucial for achieving a light texture. The rolls will expand as they proof, ensuring they bake uniformly.
Step 7: Brush the rolls with the remaining melted butter and sprinkle with chopped parsley. Bake for 20–25 minutes until golden brown.
Brushing with butter before baking adds flavor and promotes browning. The goal is a crisp exterior with a tender inside.
Step 8: Remove from the oven and allow the rolls to cool slightly before serving. Enjoy warm for the best flavor.
Cooling for a few minutes lets the rolls set, making them easier to eat. Serving them warm enhances the buttery aroma, making them even more tempting.

The Importance of Kneading Dough
Kneading dough is a critical step in bread-making, as it develops gluten, which provides the structure necessary for the rolls to rise. Kneading ensures that the dough reaches the right texture—not too sticky, yet not overly dry. By working the dough through stretching and folding, you create an elastic consistency that traps air bubbles, leading to the fluffy texture we desire in our garlic bread rolls.
Enhancing Flavor with Fresh Herbs
Incorporating fresh herbs, such as parsley, adds complexity to the flavor profile of the rolls. These herbs not only contribute aromatic nuances but also elevate the appearance of the bread. They become even more potent as they release oils during the baking process. Experimenting with other herbs like rosemary or basil can further personalize your garlic bread rolls, introducing new dimensions of flavor.
The Role of Temperature in Bread Baking
Temperature is crucial when baking bread. The warm environment during the first rise activates the yeast, while the pre-heated oven ensures a good crust forms promptly. If the oven is too cool, the rolls can become dense. Conversely, if it’s too hot, the outside may brown too quickly while the interior remains undercooked. Maintaining the right temperatures ensures that the rolls achieve a perfect balance of crust and softness.
FAQs
What should I do if my dough is too sticky?
If your dough is too sticky, gradually add more flour, a tablespoon at a time, while kneading until you achieve a smooth and elastic consistency.
Why did my rolls turn out dense?
Dense rolls usually result from insufficient rising time or not enough kneading. Ensure the dough has risen until doubled and is kneaded correctly to develop gluten.
Can I use a different type of flour?
Yes, you can use bread flour for a chewier texture or whole wheat flour for a denser roll, but this may require adjustments in water.
What can I do if my garlic flavor is too strong?
To balance an overpowering garlic flavor, try adding a touch more butter to enrich the rolls, or slice the cloves thinner before mixing.
How can I achieve a crispier exterior?
For a crispier crust, place a small pan with water in the oven while baking to create steam, helping the rolls develop a nice crust.
What if I want to add cheese to my rolls?
You can fold in grated cheese, like mozzarella or cheddar, into the dough during the kneading phase for cheesy garlic rolls.
Conclusion
Garlic bread rolls are an enjoyable recipe that blends the comforting taste of garlic with the joy of homemade bread. Their fluffy texture pairs perfectly with a variety of meals, making them a versatile addition to any table.
Whether you choose to keep them simple or experiment with additional ingredients, these rolls can become a staple in your kitchen. Embrace the process and share the delightful results with family and friends.
Recipe Card

Delicious Garlic Bread Rolls for Every Occasion
Ingredients
- 4 cups all-purpose flour
- 2 teaspoons instant yeast
- 1 teaspoon sugar
- 1 teaspoon salt
- 1 cup warm water 110°F
- 1/2 cup unsalted butter melted
- 6 cloves garlic minced
- 1 tablespoon fresh parsley chopped
Instructions
- In a large mixing bowl, combine the warm water, sugar, and instant yeast. Let it sit for 5–10 minutes until frothy.
- Add the melted butter, salt, and minced garlic to the yeast mixture. Stir gently to combine.
- Gradually add in the flour, one cup at a time, mixing until combined. Knead the dough for about 8–10 minutes until smooth and elastic.
- Place the dough in a greased bowl, cover with a damp cloth, and let it rise in a warm place for about 1 hour, or until doubled in size.
- Preheat your oven to 375°F (190°C). Punch down the dough to release air, then divide it into 12 equal pieces and shape each into a roll.
- Place the rolls in a greased baking dish, making sure they are close but not touching. Let them rise again for about 30 minutes until they puff up.
- Brush the rolls with the remaining melted butter and sprinkle with chopped parsley. Bake for 20–25 minutes until golden brown.
- Remove from the oven and allow the rolls to cool slightly before serving. Enjoy warm for the best flavor.
Notes
Additional serving suggestions: pair with a crisp salad, garlic bread, or roasted seasonal vegetables for balance.
For make-ahead, prep components separately and assemble just before heating to preserve texture.
Taste and adjust with acid (lemon/vinegar) and salt right at the end to wake up flavors.